 Chapter 3: Keiko - Practice
Beginner's Guide to Kendo
 Chapter 3: Keiko - Practice
Practice begins with 10-15 minutes of warm-up exercises. It is important to stretch and limber your muscles and joints before any kind of strenuous activity such as kendo. Pay specific attention to your wrists, shoulders, legs and ankles. An all to common kendo injury occurs to the Achilles' tendon when not enough time is spent stretching this part of the body. The footwork in kendo, particularly fumikomi ashi, the powerful lunging step, places enormous stress on this tendon.
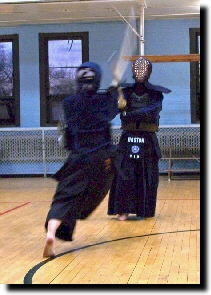
 After stretching comes suburi, the repetitive stroking in the air with the bamboo sword (shinai). Usually, this consists of shomen uchi, forward men strike, using okuri ashi, slide stepping. When participating in this drill it is important to use big motions and take big steps. Push off with your left foot sliding your right foot forward while raising your shinai above your head with elbows spread wide. Quickly bring your left foot forward to a position slightly to the rear of your right while swinging your shinai forward and out with your left hand driving and your right guiding. At the point that your left foot comes to a stop and your shinai "strikes" an imaginary target, squeeze your hands inward and enthusiastically shout "MEN". It is crucial to coordinate your strike, your footwork, and your shout (kiai) so that they occur simultaneously. This is called "ki ken tai ichi", literally spirit - sword - body - one, and is one of the fundamental qualities of proper kendo technique (waza).
 Other forms of suburi may also be practiced, including hayasuburi, quick suburi, jo-ge-buri, suburi with a large motion, or naname-buri, diagonal suburi. In addition, other types of fundamental drills (kihon) may be performed as well, such as footwork drills (ashi sabaki), or striking a baton (uchikomi). All of these drills can, and should, be practiced by all members of the dojo, those who don the armor (bogu) and those who do not. They represent the building blocks, the foundation for all other kendo techniques and methods.
After the basic drills and techniques are performed, sempai will again call the dojo to line up and be seated. This time sempai will instruct the advanced students to put on their men (men o tsuke). They will then pull their men and kote in front of them and start by wrapping a cotton towel (tenugui) around their head in a sort of turban. This will absorb their sweat and prevent their hair from obscuring their vision. Next, they will place the face mask (men) on their heads and tie it securely. Finally they will put on their gauntlets (kote), left first then right, retrieve their shinai and stand up, ready for more advanced kendo practice. At this time, beginners should also retrieve their shinai and stand up. There are still many drills and techniques in which beginners are able to participate. In fact, the only practice that beginners cannot perform is free practice (ji-geiko), the actual fencing, which by its nature requires that both kendoka have bogu.


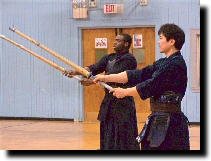
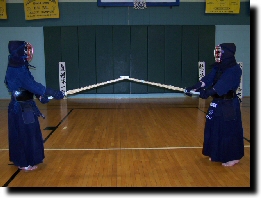
Once everyone is standing the dojo pairs up and practice is conducted in a rotational fashion called mawari geiko. Each pair of kendoka begins by bowing to each other and shouting, "onegai shimasu", which can be translated as "by your leave". They raise their shinai to their waist placing their thumb on the guard (tsuba), simulating having a sword in their sash (obi). Then they take three steps forward, draw their shinai, point it at the other's throat, and squat down on their heels (sonkyo). This is analogous to the "en garde" in western fencing, a moment to ensure that both kendoka are ready for fair play. They then stand up in the defensive position (chudan no kamae) and engage in the various drills and methods of practice that the teacher (sensei) determines is appropriate.
 After each drill is completed, the kendoka return to their starting point, tips of the shinai touching, and assume sonkyo position, sheath their shinai (osame toh), stand up and take five small steps to the rear. The kendoka then lower their hands from the taito position and bow slightly while shouting, "domo arigato gozaimashita", "thank you very much". Everyone rotates one position to their right and gets a new partner for the next iteration. This continues until the end of practice, or until the sensei announces that free practice shall be allowed. At that point, everyone is free to practice any drill, method, or technique with anyone else. The advanced students usually prefer free fencing. Beginners should take this opportunity to practice with any available sempai, or sensei. Whenever someone is available, take a position opposite them; make eye contact; bow and shout "onegai shimasu". They are obligated to practice with you and help you in your practice. Follow the procedure described above to begin practice which will usually consist of uchikomi geiko, directed striking. Sensei will show you an open target that you are expected to strike. This will be repeated for several iterations.
When sensei feels that sufficient time and attention has been given, they will signal an end to practice and assume sonkyo position. You should hurry to take up your sonkyo position, so that both may perform osame to, stand up, take five small steps rearward, lower your hands to sageto and bow. You should shout, "domo arigato gozaimashita" with sincere appreciation for the attention you received. Then find another sempai to practice with.
 When practice is over sempai will again call the dojo to line up and be seated. Waiting until sensei has removed his men, sempai will call the dojo to attention and instruct the students to remove their men (men o tore) and kote. When all the students have complied and placed their men on their kote and their tenogui over their men, sempai will, once again, call the dojo to mokuso. This time everyone should meditate upon the day's practice and prepare to re-enter the everyday world. After mokuso, sempai will call the students to bow to the teacher and bow to the dojo head. In addition, sempai will call the dojo to bow to each other (otogai ni rei), at which every one expresses their thanks; the students for the attention they received from sensei and the teacher for the effort and determination of the students. At this point it is customary for everyone to individually thank those with whom they have practiced and to receive review and critique of their performance.
Posture
 Good posture (kamae) is critical in kendo. You must strive to keep your spine perpendicular to the floor at all times. Shoulders should be relaxed and level. Keep your feet underneath your hips, hips underneath your shoulders. Keep your chin slightly held in. Your weight should be evenly distributed on both feet. The stance used in kendo, left foot slightly behind the right with the left heel slightly raised, both feet parallel, is designed, primarily, for explosive forward motion. Its narrow base requires perfect posture in order to maximize stability. Your center of gravity (tanden) should be centered between your feet as shown in the diagram at the right. The most common kamae, used by most kendoka most of the time, is chudan no kame, the middle guard. The others are high guard (jodan no kamae), low guard (gedan no kamae), hidden guard (waki gamae), and eight direction guard (hasso no kamae).
 In chudan no kamae the shinai is held out in front of the body with the kensen ponted at your opponent's throat. The left hand is held about a fist's length away from your abdomen in a direct line with your tanden. The shinai should be in the center line of your body forming a triangle with your shoulders. This affords you the most protection as the shinai forms a natural wedge that will deflect attacks to the left or right. Chudan no kamae also allows to to attack all four targets (men, kote, do, and tsuki) without telegraphing your intentions. Your shoulders and arms should be relaxed, elbows pointing down. The shinai should seem suspended by your arms. Don't hold up the shinai; don't hold down the shinai.
Gripping the shinai
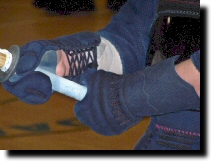
 Another critical element of kamae is the grip on the shinai. Hold your shinai with the left hand at the very base of the tsuka, the baby finger almost sliding off the end. Use only the baby, ring, and middle fingers for a firm grip with the forefinger and thumb merely tucked away. Once you make this left hand grip do not change it! Fumbling around with your grip in mid-stroke takes time and focus away from a good strike. The right hand is placed further up on the tsuka with the right forefinger touching the tsuba. Use a similar three finger grip as the left hand, but with a much less firmness. If a line was extended down from the tsuru, it would bisect your thumbs at the base knuckle. Your grip should be more like a surgeon's on a scalpel than a lumberjack's on an axe; you are going to be executing cuts, not felling trees!
Footwork
Perhaps the most important aspect of kendo is footwork (ashi sabaki). The footwork most frequently employed in kendo is generally of a type called suriashi, or rubbing feet. What this means is that your feet should rub along the floor as you go. Do not lift your feet from the floor, but rather slide them in a kind of shuffle step. Keep your toes down and avoid thumping your heels on the floor. Sensei can tell whether or not your footwork is correct by the sound your feet make. A thumping or flapping noise indicating incorrect footwork; a swishing sound of your feet rubbing the floor indicating proper footwork. Try to move in a continuous fashion, one step blending with the next.
 There are a number of varieties of footwork in kendo, each with specific application. The most common form is okuri ashi, characterized by the feet remaining in relative position to one another at the beginning and end of each step. The left foot is slightly to the rear of the right with the heel slightly raised. Both feet are parallel to one another with the weight evenly distributed. Push your body forward with your left foot; right foot sliding out to the front. Immediately bring your left foot up to its position relative to the right, that is, slightly to the rear ready for another step if needed. Here is where one simple adjustment to your footwork can have enormous effect; reduce the amout of time that your feet are spread apart to the absolute minimum. Okuri ashi is used to move forward and backward as well as from side to side.
 Ayumi ashi is characterized by each foot moving forward in turn, similar to normal walking. The difference is that the feet still rub along the floor, toes down. This footwork is used at the beginning of pair practice when you take three steps forward, draw your shinai and assume sonkyo and at the end when you take five steps to the rear. It is used in kiri kaeshi, the intense diagonal cutting drill, by the receiver (motodachi) to move forward and back facilitating a smooth flowing practice. It is also used in kendo kata.
Hiraki ashi is characterized by a diagonal movement that allows you to sidestep an onrushing opponent to deliver a counter stroke. Note that when stepping to your left your left foot is placed in front with your right foot slightly to the rear. This footwork is used during some forms of suburi, during regular practice by motodachi to facilitate practice, and in kendo kata.
Tsugi ashi, similar to okuri ashi, is used to close a long distance. It is rarely used in kendo.